Down River Resources | Your Elementary Math Guide: Math Centers
Showing posts with label Math Centers. Show all posts
Vroom! Zoom! Have you been hearing about Math Speed Strips lately? Math Speed Strips will quickly become your students’ math activity to use as an early finisher or math center activity. (I love using them in the first couple of minutes of a guided math or small group math lesson!) This post highlights the basics of Math Speed Strips, how to use them in your classroom or home, materials needed, and other commonly asked questions.  There's also a free set of Speed Strips that I want to share with you to use in your classroom or home!

Speed through subitizing and develop number sense with these differentiated sets of Math Speed Strips.

Sometimes the best opportunities come out struggles. It was mid-December and a kindergarten teacher had asked me to model a guided math lesson on the reviewing the numbers zero through 10. My goal was for this small group of kindergarten students to understand the relationship between numbers and quantities. The teacher gave me some background knowledge about the students in the group and shared that the students were ready for numbers six to 10.

Our warm-up to the lesson began. I eagerly asked the students to use their dry erase markers to write the number four on their whiteboard. The students took off the lids to their markers and starred at me. It was like they're little faces were saying, "You want us to do what?!" I immediately knew that my planned lesson was out the window! I KNOW you have been there too! It was in this moment that I realized that I needed to create a quick, fun way to help students read and recognition numbers to build subitizing and number sense skills which is painless for teachers to use in their math classrooms! Introducing Speed Strips...

* Please note: We are a participant in the Amazon Services LLC Associates Program, an affiliate advertising program designed to provide a means for us to earn fees by linking to Amazon.com and affiliated sites, at no extra cost to you. I only recommend items that I use regularly and know you will love!
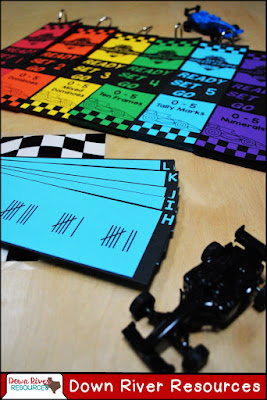
Simplifying the Road to Number Recognition and Subitizing 


Speed through subitizing and develop number sense with these differentiated sets of Math Speed Strips.
What are Math Speed Strips?


Vroom! Zoom! Energize your students with these simple strips that represent numbers in many different ways. Each set has 26 cards and each card has five numbers represented on them. The objective is that students move left to right along the strips and read the number representations. At first, students will rely on counting each number. As students practice and build their number sense, students will begin to subitize, or instantly recognize the numbers. Students can use Speed Strips independently, with a partner, or in a small group.

If you want to create a routine for using Speed Strips, add a quick two or three minute practice at the start of your small group or guided math lesson. 

Speed through subitizing and develop number sense with these differentiated sets of Math Speed Strips.
How to Use Math Speed Strips

Students get a set of cards, it can be randomly selected or assigned. Students may choose to use a mat to work through the cards in the set. 

Speed through subitizing and develop number sense with these differentiated sets of Math Speed Strips.  If using a mat, the students will place the set of cards in the center of the mat. Each card will be read left to right. Students can use their finger, a pointer, pencil, or toy car to move along the racetrack as the students read the car. These Speed Strips allow all students access to the numbers, by activating their auditory, visual, and kinesthetic modalities. 

Auditory: Students say the number.
Visual: Students see the number represented on the car.
Kinesthetic: Students move a physical object across the card as they read the numbers.

Materials Needed

Scissors or Paper Cutter
Hole Punch (I used my three-hole punch)
Binder Rings

How to Organize


Speed through subitizing and develop number sense with these differentiated sets of Math Speed Strips.  There are a variety of ways to display Speed Strips, if you are interested in something more than tossing them into a basket. I prefer each card set being accessible.

You can place Speed Strips on a peg board.

Speed Strips can be displayed on jewelry displays found at local hobby and craft stores.

Magnetic hooks placed on the side of a filing cabinet work too.

Command Hooks could also be used to place Speed Strips on an already existing surface.

How to Prepare the Sets of Cards


1. Print Speed Strips on colored cardstock. I used a rainbow pattern for the sets of cards. There is a full color cover (optional) or a black and white cover that comes with each set of cards.

- I love the versatility of colors. If you like specific colors or your classroom has a theme, you can print out the sets of cards using those colors. I used six different colors in my pattern, but any would do! 

- If you like using six colors like I did, you would need 9 pages of colored cardstock for each of the 6 sets... so 54 pages of colored cardstock in six different colors. 

- You can make it simple by buying a large pack of colored cardstock and just using them or mix-and-match the colors to your hearts content. I use Recollections by Michaels cardstock. I load up my race cart on scrapbook paper sale days... it is great for printing Speed Strips and math centers.

2. I ALWAYS cut before I laminate, but I realize that most teachers laminate the pages before cutting! I use a Swingline® Paper Trimmer as my go-to paper cutter. I was able to cut 5 pages at a time (since it is heavy cardstock, which sped up the prep time!

3. Place the Speed Strips at the edge of the three-hole punch (see photograph for alignment). I use a Swingline® 20-Sheet Desktop Hole Punch - Silver. Since I was using cardstock, I only punched a few at a time. If you punch too many, the strips get stuck and can easily tear. Avoid this by punching about five strips at a time.

4. Place each Speed Strips set on a binder ring. Each strip is identifiable by a letter of the alphabet on the right side. You can organize the Speed Strips in alphabetically or randomly. Just make sure the cover shows when displaying the cards!

Speed through subitizing and develop number sense with these differentiated sets of Math Speed Strips.


If you want to use this activity to check each students’ level of understanding, there are pre-assessments and progress monitoring tools included. These tools can help you meets students' individual needs for RtI or intervention through these simple assessments (see below at some of the tool included.)

I love using the colored sponge tip applicators when collecting data on the students. It is so simple to mark the correct responses!

Speed through subitizing and develop number sense with these differentiated sets of Math Speed Strips.


Want to try these for FREE?

I'll keep you afloat. I encourage teachers to give them a try, but I can guarantee that once your students start using Math Speed Strips, they will be begging you for more!  Download a free set of Speed Strips by clicking on the button below!


Speed through subitizing and develop number sense with these differentiated sets of Math Speed Strips.

What skills are included in this Speed Strips Number Sense Bundle?


Dice
Dominoes (common representations of the number are shown on the ends of the domino)
Mixed Dominoes (mixed representations of the number are shown on the ends of the domino)
Ten Frames
Tally Marks
Numeral

These skills are represented on six card sets for each of the number sets 0-5, 6-10, 0-10, 11-15, 16-20, and 0-20. 

These groupings of numbers allow students to master small number sets, before adding numbers that are unknown. It helps build on students' strengths!

If you want to use the 36 differentiated Math Speed Strips in your classroom, you find it in my TpT shop. 

What ways are you promote subitizing and number sense in your classroom?


Spring brings butterflies, chicks, blossoms, and... plastic eggs! People near and far hunt for these special spherical objects hidden in secret places. I tend to just go straight to the seasonal aisles of my favorite stores and find a wide variety of plastic eggs to choose from with a lot less hassle. In recent years, the stores are stocking an eclectic mix of eggs. These eggs include special shapes (animals and carrots), unique patterns (faith-based words, animal print, camouflage), extra-sparkly glitter, golden, and transparent eggs...these probably just list the ones stocked at eye-level! I stockpile a large assortment of these diverse eggs and pair them with rigorous math concepts to create the perfect math centers for kindergarten, first, and second grades. While my ideas are focused on these grade levels, many of them can be adapted for other grades too! This is my go-to list for simple math centers using plastic eggs.


Creating the Best Math Centers Using Plastic Eggs


Matching Math Centers


Plastic eggs are versatile! You can write on them, fill them, or do both!

I love writing on them....probably because I stockpile school supplies like my husband stockpiles freeze-dried rations (insert "yuck" face!)

Numeral + Tens Frames (Kindergarten)


Grab a regular Sharpie marker and some of those eggs and get marking! One of my favorite ways for students to use the two parts of a plastic egg is to match the numeral to the tens frame. This helps students read and represent whole numbers 0 to 20 with objects (TEKS K.2B.)

You can also match the numeral to a tally mark, subitizing dots, the number word, or stickers placed on one of the parts!

Composing Ten (Kindergarten, First, & Second Grades)


Another way to use the "matching" concept is composing numbers. When two numbers are added together, this is called composing numbers. Students simply match two one-digit addends which add up to 10.

Kindergarten and first grade students are asked to compose numbers to 10 (TEKS K.2I & 1.3C.) This concept of putting two numbers together to form one can also build a second grade student's automaticity with basic facts (TEKS 2.4A.)

Stacking Math Centers

This might be my favorite way to use plastic eggs! Since you are only using one of the parts, the eggs go a long way. You will have more pieces to create more centers...and what do I want to make? More centers! 

Counting by Tens (Kindergarten & First Grades)

I love how simple algebraic reasoning skills can be practiced by stacking the pieces into a tower. Your students will think the best part of this math center is trying to make the tower stay up. It is VERY common that the entire tower will fall, so students are practicing a lot more than just algebraic reasoning with this center.

I use this center for counting by 10s (TEKS K.5.) This same concept can be applied to skip counting by 2s, 5s, and 10s (TEKS 1.5B.) Skip counting is also a great skill to continue practicing in second grade as the students will apply this skill to contextual multiplication. 

Sequencing Math Centers


No matter which grade level you teach, you can use this concept of sequencing numbers with plastic eggs. The concept remains unchanged, but the numbers will be different. You can also tailor this center to your students' needs. You may have a student who is struggling or advanced, whichever the case, add eggs with the numbers that best suits students' needs.

Kindergarten students practice numbers 0 through 20 (TEKS K.A,) while first grade students use numbers up to 120 (TEKS 1.2F.) Second grade students practice ordering numbers up to 1,200 (TEKS 2.2D.)

Ordering Whole Numbers (Kindergarten, First, & Second Grades)


This egg carrier was purchased at Dollar General for $2. They can also be found at Dollar Tree for $1. Most of these egg carriers hold 12 or 24 eggs. You can make the exact amount of eggs needed or less. The carrier just acts as a place holder for the eggs.

The best thing of all if that there is a center section which can hold the pile of eggs (see the top part of the image.) Students can pick up one egg at a time and place it in a spot. As students pick up additional eggs, they may need to move eggs as the place value of each of the numbers is determined. The carrier works as an open number line.

Filled Math Centers

Using filled plastic eggs, you could teach any math skill! You can write numbers, draw shapes, or create word problems on a piece of paper, fold it up, and place it inside a plastic egg! That's as simple as ABC, friends. I use a variety of materials to fill the eggs just to keep my students interested in egg activities so they are not repetitive.

_ More and _ Less (Kindergarten, First, & Second Grades)

Yes, there is a reason I left a blank in the title for this section! You can tailor this center to meet the needs of any grade level or any child.

Kindergarten students are working on one more and one less (TEKS K.2F,) while first grade students are learning 10 more and 10 less than a given number up to 120 (TEKS 1.5.) Second graders expand on this idea by determining the number than is 10 or 100 more or less than a given number up to 1,200 (TEKS 2.7B.)

You can place a card within the math center to indicate if the students are working on the number than is _ more or _ less than the given number or they can generate both numbers.

I had students simply take a strip of notebook paper and number it, like we do for spelling tests, then students drew their eggs, opened them up, and recorded their answers individually. The example shown is for first grade (10 more and 10 less than a given number). The numbers on the eggs represent the problem number for recording purposes. The number on the sticky note is the number that students use to generate their answers.

Counting (Kindergarten)


We all need another excuse to buy those irresistibly cute Target erasers, right?! Well, here's another one!

Fill the eggs with a certain number of erasers. Students will open one egg at a time and count to determine the quantity held in the eggs. I numbered the eggs so that the students can record their answers.

Again, I used a strip of notebook paper and had students number it, like we do for spelling tests. As they select eggs out of the basket or container, they record the answer on the corresponding line.

Kindergarten students are learning to count forward to 20 (TEKS K.2A,) and counting a set of objects up to at least 20 (TEKS K.2C.) This activity also build students' one-to-one number correspondence. 

Graphing (Kindergarten, First, and Second Grades)

This same concept of filling the eggs or placing objects within them can be applied to data collection, each egg could contain a specific object (erasers, jelly beans, etc.) and students record the data on a bar graph or picture graph. Students are learning how to collect and organize data (TEKS K.8ABC, 1.8ABC, 2.10CD.)


Coin Collections (First and Second Grades)


Fill plastic eggs with coins. I try to use real coins when I am able to as they are more life-like. Plus, there are so many varieties of coins, I have yet to find a math manipulative that captures their new look. Each egg is filled with a different combination of coins.

First graders are learning how to count by 1s to add up the value of pennies and skip count by 5s and 10s to add up the value of nickels and dimes (TEKS 1.4ABC). Second grade students are determining the value of a collection of coins up to one dollar (TEKS 2.5AB.)

I used a strip of notebook paper and had students number it, like we do for spelling tests. As they select eggs out of the basket or container, they record the answer on the corresponding line. In the example in the photograph, I had the second graders write the value of the collection of coins using the cent symbol and the dollar sign and decimal point to specifically meet the rigor within the second grade standard (TEKS 2.5B.) First graders would write the value of the collection of coins using the cent symbol.

Whew! That was a plethora of ways that you are create the BEST math centers using plastic eggs. I love that each of these math centers are rigorous.

Did you notice each idea I used was standards-based and met the specificity described? Students are practicing the power words in education: determining, generating, representing, composing! These are the higher-order thinking skills we want them to use and practice, practice, practice. Why not use plastic eggs to accomplish this? 

In addition, these dynamic math centers are be differentiated based on your students' needs. If your students has not mastered three-digit numbers, create some eggs with two-digits. If your students have surpassed the grade level goal, make them four-digit numbers! I love using plastic eggs in math centers as they are rigorous and meet the needs of diverse learners in my classroom.

I hope this inspires you to turn those leftover plastic eggs into some engaging math centers for diverse learners!

What is your favorite way to use plastic eggs for math centers?


I send out exclusive tips, tricks, and FREE resources to my partners. Drop your email below to become an exclusive partner!

Plastic eggs are not just for an Easter egg hunts! After a delicious Easter meal, the kids take part in a large Easter egg hunt at my parent's house. There are so many good hiding spots and, as usual, the older kids dominate the hunt. Colorful, plastic eggs jingle with coins and jellybeans...chocolate and a dollar bills too, but only if you are lucky! After a few quick minutes, everyone gathers back on the porch. The kids quickly hide their money (after counting it, of course!) and throw their eggs into a large sack. While everyone is eating jelly beans and some eat chocolate, I begin my favorite activity of the post-Easter season! I re-purpose those colorful, plastic eggs and create rigorous math centers that can be used for the rest of the school year. While I hunt high and low for interesting eggs, I can never have enough. So, what's the big deal with plastic eggs? I'm glad you asked...


Top Five Reasons to Use Plastic Eggs in Your Math Centers


1. Plastic eggs are inexpensive...unless you buy an entire cart full of them. Guilty as charged!

Most of the eggs I buy are about 98 cents to $2.00 per package. Of course, the basic colorful eggs are most inexpensive, while the larger, themed eggs are most expensive. I try and think about what I would like to use them for before I buy so I can have a quantity in mind...but most of the time I just buy, at least, two packages. That way, I am guaranteed to have a little variety in whatever I end up creating! I mean, when you see cute eggs you just buy them...kind of like those Target erasers. Gasp!


2. Plastic eggs can be used year-round. There is so much diversity in the type of eggs you can buy, you can use them seasonally and/or with your classroom themes.


I have eggs with sports theme that I use during those seasons. I also use the animal-shaped eggs to coincide with teaching about organisms. I love making as many cross-curricular connections using math as possible. Not only is it a great way to spiral, or revisit, previously taught content, it also gets the students engaged with the theme!

3. Plastic eggs provide a hands-on, or tactile, way which stimulates the brain.


Tactile learning take place when the students are carrying out the actual physical activity! Whether the students are sorting through the eggs or opening them up, students are actively participating in the math center.

4. Plastic eggs are versatile.... they can be written on with a permanent marker, stickers can be added on them, and/or they can be filled!


Pick your favorite way to use plastic eggs, mix it up, or use them all! Plastic eggs allow you to use them creatively to accomplish your specific learning goals for math centers.

My favorite writing tool to use on plastic eggs is a regular Sharpie marker in black. It goes on nice and smooth. I tried the flip chart version of the marker and it left marks.

5. Plastic eggs are reusable! Not only can you have an amaaazing Easter egg hunt with them, but you can use them within a center.


Don't worry if you are late to the Easter egg party! If you create a last-minute center this year, it will be ready to go for next year! You can break apart the eggs to compress them for storage, creating towers of like ends. Perhaps, you can even find some eggs on clearance... fingers crossed!


Why would you buy plastic eggs for your math classroom?


Have you heard of the interactive math game, Splat!? There are different variations and different games with the same name, but I use this interactive game to get my students engaged about a particular math concept which we have already learned. It can be used for interactive math reviews. It encourages students to analyze number relationships to connect and communicate mathematical ideas. This is a process standard that students can always use more support in practicing. Splat! is a fun way to apply mathematical concepts and makes for a fun math center, small group, or whole group game.


Using Splat! in the Math Classroom


Suggested Age Range for Activity


Splat! can be used with any grade level of students, just make sure that the content being reviewed is developmentally age appropriate or specific to your grade level's standards. 

Preparing for Activity 


Splat! games are relatively easy to prep. You will need a tall cylindrical tower. It works best with a potato chip can!

If you needed an excuse to buy more potato chips, here it is! After all, once you pop, the fun just doesn't stop! Now, the fun can continue for your entire school year! 

First, print out the cards. Then, cut out the cards and laminate. My games are created in both blackline, for ink savings, and in color which really makes the fun seasonal faces POP!

Regardless of which route you take, I recommend printing the cover for the cylindrical can in color. I use white copy paper so it bends around the surface better. I added some colorful complimentary washi tape on the top edge.

If using a tall can, you will need something to make up the difference, as the paper is only 8x11 inches tall. If you use a new shorter can, you will have to cut a little of the space on the top as the height of the can is shorter than the paper! (I've tried both ways! The really good flavors of chips come in the shorter cans! I like using the tall cans so I can utilize my colorful washi tape!)

To make it last longer and protect it from water and dirty hands, add packing tape around the paper as a protective
coating! 

Teacher Tip: The thing that I love the most about Splat! is that the can you use to create the tower in the game also serves as storage for all of the game cards! 

To make the cards self-correcting, mark the correct answers with an adhesive dot on the back (yard sale sticker). If playing with your class, there is no need for this step, unless you will be adding it to an independent math center or station or using it for an activity for early finishers.

Reviewing Math Concepts with the Game Splat!


I try to find simple skills in the list of standards that could be turned into a one line question for the games I create.

Kindergarten Sample Questions:
What is 1 more than 6?
What is 1 less than 8?

First Grade Sample Questions:
What is 10 more than 55?
What is 10 less than 34?

Second Grade Sample Questions:
Is 27 odd or even?
Is 15 odd or even?

How to Play the Interactive Game Splat!


To play, set a timer for the amount of time you have to play, or stop play when the session is over.

1. Mix up the cards (math question cards + Did Somebody Say Splat Cards + challenge cards). Place the deck of cards facedown on the table.

2. Have players read the card and generate the correct response. The player should say that answer three times. This is my variation, but can be modified however you'd like.

3. After they answer the question, they place the card on the top of the tower.

If players pick a Did Somebody Say, “Splat?” card, they should simply place that card carefully on top of the “tower.”

If it stays there securely, that players turn is over. If that card or any other cards go SPLAT (falls off the tower,) that player must take all cards that fell.

If they pick a #challenge card they must follow the directions on the card. The same procedures apply.

The object of the game is to stack cards carefully without making any go SPLAT! Players that knock down cards must take them. 

At the end of play (either when the session ends, the timer rings or there are no more cards to play), the player with the LEAST cards is the winner!


There are so many different ways that you can manipulate the play of this game using the three different cards types. Find the way that you like best and get your students excited about math! 


I hope this post inspires you to use Splat! in your classroom and if you want to use my Splat! games, they're in my TpT shop.

What are some other ways you review math concepts in your classroom?

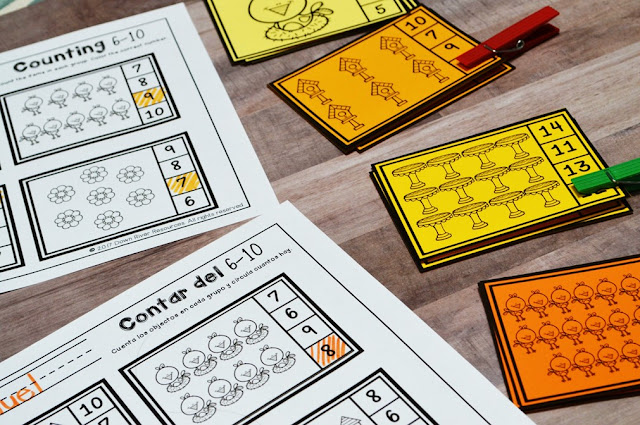
Have you heard of clip cards? Often used in preschool and kindergarten classrooms, clip cards or count and clip cards are great for practicing a variety of skills. They can be used with any subject, but, of course, my favorite is math. My students are able to practice rote counting and one-to-one correspondence with most of the sets of clip cards. Students look at the large box and count "how many" and place the clip on the correct answer. Not only do they benefit from practicing the math skills, they also practice their fine motor skills when attaching the clothespins to the correct answers.

Down River Resources

Using Clip Cards in the Math Classroom


Down River Resources Suggested Age Range for Activity


Clip cards are best for early learners (pre-school through first grades.) Older students with a diverse range of learning abilities can also benefit from this hands-on math center.

Preparing for Activity 


Clip cards are relatively easy to prep. First, print out the cards. Then, cut out the cards and laminate. 

Teacher Tip: I always suggest laminating the cards for durability. If you are planning on using these as early or fast finisher activities or within a regularly visited math center, it is best to always laminate first. Otherwise, you will have stray marks on random cards that will drive you cRaZy! Trust me, friend. Even if you plan on using the cards once, it'll be worth it. You can use these cards for small groups, Guided Math, intervention time, or tutoring later. In addition, the weight of clothespins will bend the cards if they are not laminated.

To make the cards self-correcting, mark the correct answers with an adhesive dot on the back (yard sale sticker).

You can set them in a basket or bin and they're ready to go!

Ways to Maximize the Usage of Clip Cards


Down River Resources
At first, students are just learning their numbers so this type of practice may be difficult. It also may come very easily to other students. It is important to maximize the use of any resource in the classroom, especially if your goal is to meet the needs of ALL of your students, especially those who need additionally support. 


One thing I like best about clip cards is that I am able to use one set of cards and differentiate the activity type of segments of my students. I have several students who are struggling and need a lot of hands-on, tactile practice with manipulatives. I can use clip cards can benefit these students! On the other hand, I have students who are mastering the basic math skills and are ready for a challenge. Clip cards are also advantageous for these students as well.

Here are some of my go-to tools I use to maximize the usage of clip cards in my classroom:


Down River Resources
Add a dry erase marker and board to the math center. Students can write a different way to represent the number on the dry erase board as an extension activity. Or, students can write the numeral for additional practice.


It is important for students to know how to represent whole numbers in various ways with and without picture and objects. This is a great activity to build this foundation of whole numbers.
Down River Resources
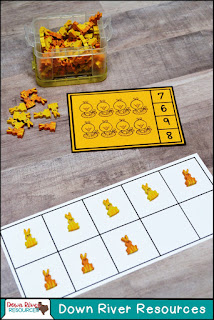
Did you need ANOTHER excuse to buy erasers? I know I sure did! Add a small bin of erasers to the math center. Students can practice one-to-one correspondence by adding an eraser on top of each object depicted on the card.

One-to-one correspondence is when you match one object to one other object or person. You can practice this in various contexts but it is best to use a tactile method first. This is often why you see parents using their fingers while saying their numbers as it builds on this skill. A number doesn't mean anything if you do not know that it represents a quantity.


Down River ResourcesAdd a laminated ten frame to the center and that small bin of erasers to your math center. Students can practice building the number of the ten frame.

This extension allows students to practice applying the mathematical process standards to acquire and demonstrate mathematical thinking. Students are able to create and use representations to organize, record, and communicate mathematical ideas.

Students not allow build the number on the tens frame, but they can explain to their partner how they built the number. It is important that students know that when using a ten frame, they place objects one-by-one, from top to bottom and left to right


Clip cards can be used in so many ways to benefit our students in the math classroom. They build students' number sense and fine motor skills. These cards are great for so students can acquire and demonstrate mathematical understanding.

I hope this post inspires you to use clip cards in your classroom and if you want to use my clip cards, they're in my TpT shop.

What are some other ways to use clip cards in your classroom?


Down River Resources
dr. seuss math activities


Read Across America Week, Springtime, and Earth Day are all soon approaching... too fast for my liking! Dr. Seuss' fun truffela trees make the perfect math center for kindergarten and first grade students. By this time of year, kindergarten students should have a grasp of the first 10 or 15 numbers. Students should be quickly working towards knowing their numbers up to 20 by the end of the year. First grade students with number sense have met this goal before, but diverse students may still be working towards achieving that goal. This fun math center will provide you the opportunity to practice building number sense in your students during these spring months or whenever you feel "Seuss-ical!"

Using the Lorax in a Fun Math Center


lorax math activities
Dr. Seuss' The Lorax is a fictional children's book that was published in 1971. The passionate orange fella, also the main character, the Lorax, speaks for the trees against the antagonist, the Once-ler. The Once-ler tells a tale of the beautiful valley containing a forest of Truffula trees, a whimsical organism, and a range of animals. He paints such a beautiful picture, but it was he who destroys it for greed. He uses the plant to create a material at the large factory. 

The Lorax is a really great story for students to be introduced to environmental science. It is a popular picture book to read for Earth Day too! This tree that once towered over the animals has been brought to life in their own unique way, as fluffy flowers. They stand tall and are quite magical as they help students read and recognize numbers to 20. 
spring number puzzles for kindergarten

Incorporating Science Vocabulary through Math Center


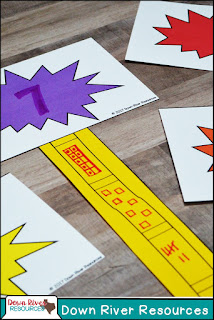
I love calling the pieces of this math puzzle by their correct name too. I use the word "flower" to describe the tops or starburst looking pieces. "Stem" or "trunk" can be used for the bases which three representations of each number are found including: ten frames, tally marks, and base-10 cubes.

It is the students' task to put together the fluffy flowers with the correct pieces, matching the numeral to the representations.
dr. seuss math activities

Diverse Ways to Prepare this Rigorous Resource


Prepping the math center can be as easy or difficult as you'd like it to be. The EASIEST way is to keep the rectangular shapes around the flowers and stems, so you do not have to spend an hour cutting out around the jagged edges.

As you can imagine, the most difficult way to prepare this math center is by cutting out the flowers and stems. While it does give this center A LOT of pizzazz, it is time consuming.

Let's face it, you might not have time for that. ;) 

read across america math centersYou've probably noticed through the photographs you can print with an ink-saving option (black line) or full color, if you happen to have an ink fairy at your school...I'm not so lucky.

Now, friends, this is probably the feature I looooove the best! It is perfect as a challenge in kindergarten and gives a differentiation option to first and, even, second grades.

There is a set of blank templates. THE STUDENTS fill them out and create their own. In kindergarten, they'd probably follow the same format. In first grades, students can write larger numbers up to 120, while in second grades students can use numbers up to 1,200.

Can you imagine using this option and each kiddo making one? I think that would be a cute bulletin board display!

In fact, I'm off to prepare for that now!

I hope this post inspires you to be creative this spring in your math centers and if you'd like to use my fluffy flowers number puzzles, you can find them in my TpT shop.

What are some ways that integrate math math during these fun spring holidays?

texas kindergarten

Texas Independence Day marks the date that Texas became an independent Republic. Texans annually celebrate on March 2nd with parades, festivals, events and family festivities. It is a proud day in Texas history, ya'll. You may be looking for some great engaging resources and ideas on how you can bring this celebration into your classroom. I loooove teaching Texas history through math and reading as it presents so many advantageous cross-curricular connections.

kindergarten math centers

Engaging Ways to Learn about Texas Through Math

Students in kindergarten, first, and second grades enjoy hands-on learning activities for math. This is exactly why I used this modality for this special bundle of math centers to teach about the state of Texas' symbols. Number puzzles are some of the most beloved math centers in my classroom and that has been the case in every grade I have taught! Kids are drawn to games! Plus, they love a challenge. 

The Texas-sized math center bundle helps me meet many math standards including how to read and write numbers to 20, and counting forward and backwards within 20. This bundle includes three centers: 
counting forward number puzzles

Counting Forward 1-20 Number Puzzles 

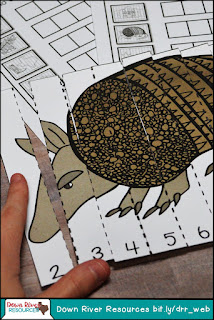
- Students need to unscramble the pieces using sequencing skills.
- There is a printable support mat for diverse students who need help organizing the puzzles pieces as they go.
- It includes English and Spanish recording sheets where students will write the number sequence from the puzzle down so they are learning and working during math centers.
*BONUS: The recording sheets hold students accountable AND it creates an additional opportunity for them to practice writing their numbers.

Counting Backward 20-1 Number Puzzles 

- I have seen tremendous progress mastering counting backwards since I have found ways to integrate it into our learning more frequently. 
kindergarten clip cards

Counting Clip Cards 1-20 

- There are eight pages or 24 clip cards.
- The most common use of clip cards is using a clothespin to mark the number that matches the set shown on the card.
- You can also laminate and use dry erase markers to mark the correct answers.
- There are 8 printables included in English and Spanish.

I use these centers for two weeks in my classroom. Since the number puzzles come in a set of 10, I have my students complete 5 puzzles within one center per week. The students really need the extra time to record their work instead of doing more puzzles.

Engaging Ways to Learn about Texas Through Reading


I pair the Math Center Bundle with another Texas-sized bundle that I have been using for awhile. It comes from Rachael of Sweet Sweet Primary. (She makes the cutest centers for the K-2 classroom.) Each component of the Texas bundle is unique and allows me to meet literacy standards as we go through our Texas unit. Plus, there are many great things I can use for a quick bulletin board display.

Her bundle includes: 

Texas Write Around the Room

- I tape the colorful Texas symbol cards around the room. Students walk around during literacy centers and match the symbol on the card to the symbol on their paper. They use the card as a scaffold to spell the words.

Cowboy Glyph

- Students answer questions and build a cowboy based on their answers.
- When finished, we display them all together to graph how many students in our classroom have done each activity.
- This is one of the activities that make a great bulletin board!

Texas ABC Order

- I follow the same procedure as listed above taping the cards around.
- ABC order is so tricky for students and it is great to find a set of cards that has a couple of words that begin with the same letter.
- This is the time of year where I want to start challenging my students! 

Texas Our Texas Unit

- Personally, I think this is where you get the Texas-sized value.
- My favorite component from this resource is the mini-book of Texas Symbols. It has two variations so its provides another way for me to support diverse learners in my classroom. I have a few kiddos who need occupational therapy and cannot use their hands well. There is a completed book that students just need to color. This is a terrific way that I can modify the book to allow my students to participate along with their peers.

There is just too many things that I love about this bundle. You'll just have to check it out for yourself! 


I hope this inspires you to celebrate Texas history and maximizing on the opportunity to teach social studies through math and reading and if you want to use my math centers or Rachael's literacy centers you can find them in our TpT shops.

What is your favorite Texas activity to use in your classroom?


Back to Top